The following methods apply to Connecting Smoke Alarms purchased from Fire Safe Online. If you require further help, you can refer to the instruction manual or jump over to the contact us page and send us a message, Alternatively you can message us on Facebook.

Connecting Smoke Alarms – Value Range
Switch the smoke alarm on
1 Switch on all the alarms by turning the lever on the back to the on position. Please be sure not to rotate the switch past the on position as the lever switch may break off.

The on/off switch, when in the off position will be facing down identical to the image above.
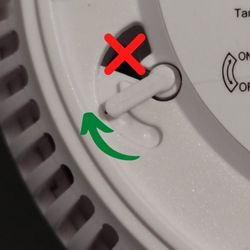
The on/off switch can be moved in a clockwise direction to switch the device on.
Connecting smoke alarms with a remote
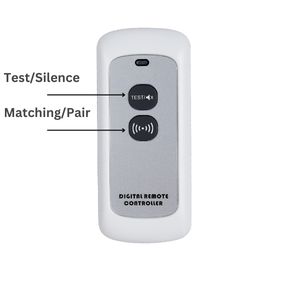
2 Hold down the test button on the remote until the light at the top flashes 3 times, and then release. This means that the remote is now in pairing mode. You will have 1 minute to complete the pairing process of all the alarms.
3 Select one of the alarms you wish to pair, Press and hold the large button on the face of the alarm until the green light flashes 2 times, then release. The red light will flash slowly three times to indicate a successful connection to the master/remote.
4 Repeat step 3 for all devices you wish to connect to the device network.
5 To end the pairing process, press the test button on the remote, or wait until the remote stops flashing
Connecting smoke alarms without a remote
2 Select one of the devices to start the pairing process.Press and hold the large button on the face of the alarm until the green light flashes three times, then release. After you release the button, the light will flash rapidly for one minute. This means that the master device is now in pairing mode, you will have one minute to pair the devices.
3 Select another one of the alarms you wish to pair, Press and hold the large button on the face of the alarm until the green light flashes 2 times, then release. The red light will flash slowly three times to indicate a successful connection to the master alarm.
4 Repeat step 3 for all devices you wish to connect to the device network.
5 To end the pairing process, press the large button on the face of the device you used to start the pairing process, Or wait until the device stops flashing.
Purchased an additional alarm?
2 Ensure the new alarm is switched on correctly (step 1). Select one of the connected devices you had previously installed. Press and hold the large button on the face of the alarm until the green light flashes three times, then release. After you release the button, the light will flash rapidly for one minute.
3 Select the new device, Press and hold the large button on the face of the alarm until the green light flashes 2 times, then release. The red light will flash slowly three times to indicate a successful connection to the master alarm.
Testing operation
1 Select any device installed on the network and press the large button on the face of the alarm down once and release. Wait until all alarms are sounding to confirm the operation. If the alarms are installed, you will need to walk around the house to verify all devices are working.
If you have a remote, press the test button instead of the alarm unit as the process is outlined in step 1.
2 To stop the alarms from sounding, press the large button on the front of the device or wait until they stop alarming.
Resetting a device
1 Hold the large button down on the face of the device you want to reset until the green light flashes four times, then release the button. The device will beep and flash to indicate the device has been reset.
Remote Hold down the test button until the light on top flashes 4 times.
Having trouble connecting?
If you are having trouble connecting the devices, please try the following steps:
1 Try resetting all the devices and start again. This is best done on a table where you can place all the devices together. First, make sure all devices are switched on by turning the lever on the back to the on position.
2 Follow the instructions for Resetting a device, Do this to all the devices including the remote (if using a remote).
3 Restart the pairing process and follow the Connecting Wireless Devices guide.
If you are still experiencing problems, please contact us.
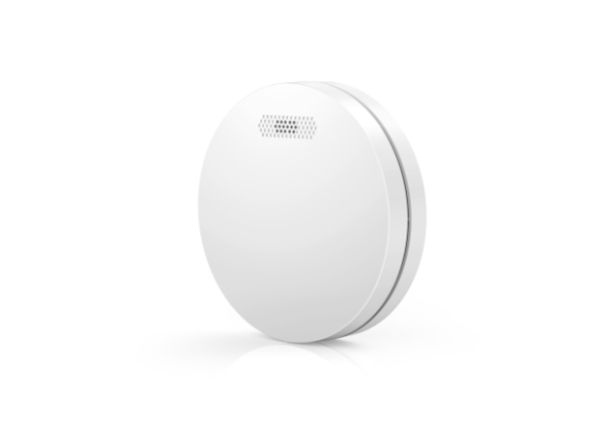
Connecting Smoke Alarms – Premium Slimline Range
Turn the devices on
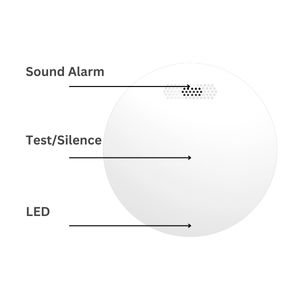
1 Press the center (test/silence button) of the smoke alarm until a red light flashes once and a beep is heard indicating the alarm is now on, then release. This should take approximately 10 seconds.

Please note: The indicator light maybe difficult to see in bright lighting conditions, if you hear the single beep, the smoke alarm is on.
To turn the alarm off, follow the same steps. The smoke alarm will flash and beep twice to indicate the alarm has switched off.
Note: There is no physical button in the centre of the smoke alarm, the button is hidden under the cover for a sleek design
Important: Older (Before MAY/2024) slimline smoke alarms can not be turned off while silenced
The smoke alarm can be in its normal state, or while alarming. If a smoke alarm is silenced, holding the center button won’t stop or have any effect on the smoke alarm. You would need to wait until the silence period ends, then turn the smoke alarm off.
Connecting smoke alarms with a remote
1 Press the test/silence button on all alarms twice, the green LED will slowly flash continuously, indicating it has entered the receiving mode.
2 Press the Matching button on the remote, and the red LED will light up, it has entered the transmitting mode. When the alarms have received the signal, the network will be paired.
- If pairing is successful: The green LED of these alarms will stop flashing.
- If pairing has failed: The green light will continue to flash for 60 seconds, then the red light will stay on for 2 seconds.
Connecting smoke alarms without a remote
1 Press the test/silence button on one of the smoke alarms 4 times, and the green LED will rapidly flash continuously, indicating it has entered the transmitting mode (valid time: 60 seconds).
2 Press the test/silence button on each of the other alarms twice, and the green LED will slowly flash continuously, indicating it has entered the receiving mode.
- If pairing is successful: The green LED of these alarms will stop flashing.
- If pairing has failed: The green LED will continue to flash for 60 seconds, then the red light will stay on for 2 seconds.
Purchased an additional alarm?
1 Turn the new device on as detailed in step 1 of : Turn the devices on.
If you have a remote:
2 Place the device in pairing mode by pressing the test/silence button on the alarms twice, the green LED will slowly flash continuously, indicating it has entered the receiving mode.
3 Press the Matching button on the remote, and the red LED will light up, it has entered the transmitting mode. When the alarms have received the signal, the network will be paired.
Without a remote:
2 Press the test/silence button on one of the smoke alarms that are currently connected to the network 4 times, and the green LED will rapidly flash continuously, indicating it has entered the transmitting mode (valid time: 60 seconds)
3 Press the test/silence button on the new smoke alarms twice, and the green LED will slowly flash continuously, indicating it has entered the receiving mode.
Test the smoke alarm network to ensure the newly added alarm is triggered with all the other alarms within the network.
Testing operation
1 Select any device installed on the network and press the center (test/silence button) of the alarm down once and release. Wait until all alarms are sounding to confirm the operation. If the alarms are installed, you will need to walk around the house to verify all devices are working.
If you have a remote, you can use it and press the test button to complete your smoke alarm testing.

2 To stop the alarms from sounding, press the large button on the front of the device or wait until they stop alarming.
If you are experiencing problems pairing your smoke alarms, please contact us.
